Complete Buying Guide to Barn Door Hardware Kit
If you want to install a barn door at home, then the same consideration is to buy a set of barn door hardware kit. It can be said that the two are inseparable, the door panel is the flesh, the hardware accessories are the bones. Only when they work together can they play a real role.
So, how to choose a suitable set of barn door hardware kit, as a professional hardware manufacturer, in this complete guide, we will introduce you to the main parts and extra parts of the barn door hardware kit, how to measure your barn door & what size barn door hardware you need, and simple installation steps.
Parts of barn door hardware kit

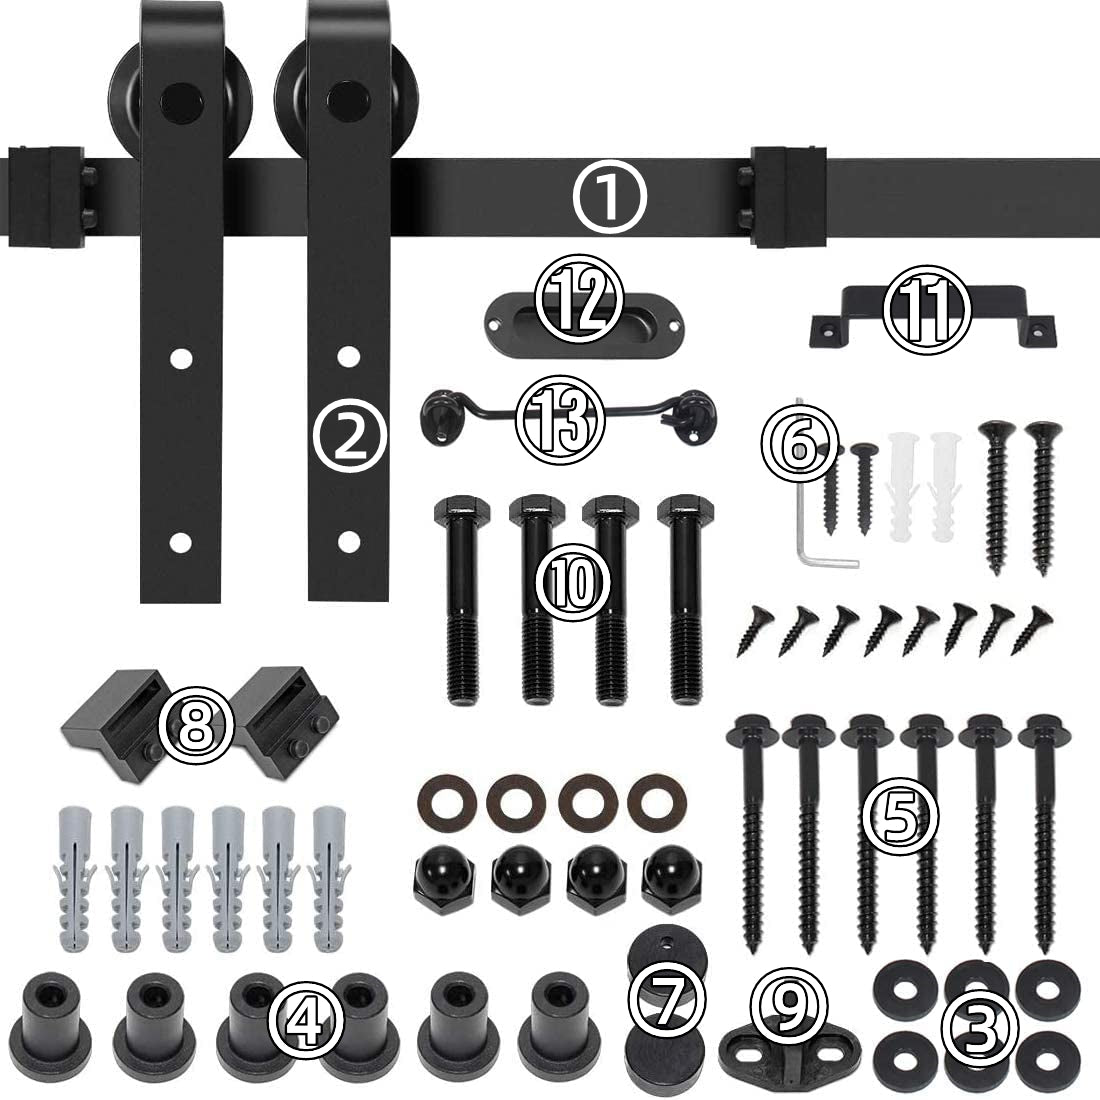
Take our J-shaped sliding barn door hardware kit as an example, it consists of the main parts and extra parts. The main parts are indispensable, and the extra parts are designed to make it more convenient to use.
Main parts
1. Rail x5
2. Roller x2
Holes distance: 3.52"
High-quality sliding pulleys ensure that the barn door slides smoothly and is used quietly and without noise.
3. Shim x6
Supplied for door thickness over 1.77", door with frame/baseboard.
4. Rail spacer x6
5. Installation screw & Ribbed plastic anchor x6
Screw size: M8*3.8" Anchor size: φ9*2.01"
6. Installation tool
7. Anti Jumper & Black screw x2
Screw size: M4*0.7"
The anti-jump protects the barn door from touching the railing when sliding the door.
8. Door stopper x2
Prevent the barn door from rolling off the railing and ensure that the door closes quietly.
9. Floor guide x1 & Ribbed plastic anchor x2 & Black screw x2
Anchor size: φ6*1.18" Screw size: M4*0.7"
Prevent the barn door from swinging outward or leaning against the baseboard.
10. Door install screw x4
Size: M10*2.2"
Extra parts
11. Black surface handle x1 & Black screw x2
Holes distance: 5.31" Screw size: M5*1.3"
Follow the ergonomic design, the grip is very smooth providing a more comfortable feel. Suitable for a variety of home decoration styles.
12. Black recessed handle x1 & Black screw x2
Holes distance: 3.62" Screw size: M4*0.7"
This modern style black recessed handle brings an urban atmosphere to your space, and the bold design perfectly blends with your modern decoration.
13. Black hook x 1 & Black screw x4
Holds distance: 1.02" 5.7" Screw size: M4*0.7"
Add extra security and privacy to every corner of your house. The simple unlocking design allows you to unlock quickly and easily. You don’t need to waste time looking for keys in an emergency. It can provide you with security under any circumstances.
How to measure & choose the right size?
On this question, it is actually how to measure and select the right size of the barn door. If you have already bought the right size of the barn door, then just choose the corresponding length of barn door accessories.
If you don't know how to choose the right size, you can refer to the following two criteria:
Length: Barn door and regular swing door is not the same, in order to take into account the privacy of the family, it is generally recommended that your barn door width is slightly larger than your opening size, leaving at least 1" of width on the left and right sides. For example, your opening width is 36", then your hanging rail length should be at least 38" or more.
Shop different size barn door hardware> 5ft, 6ft, 6.6ft, 8ft
Height: For barn door hardware, generally you don't need to consider the height, this height actually refers to the optimal installation height. Due to the hanging mounting method characterized by barn doors, they must also be higher in height than the opening of the door opening. We recommend leaving a 5" clearance above the top of the door for easy installation.
Simple installation in 8 steps
STEP 1: Drill the holes on the wall.
STEP 2: Install the metal track.
STEP 3: Install the hangers onto the door.
STEP 4: Install the anti-jumpers on the door.
STEP 5: Hang the door on the track.
STEP 6: Install the door stoppers on the both sides.
STEP 7: Install the floor guide.
STEP 8: Complete the barn door hardware kit installation.
Visit our step-by-step video installation guide>


Leave a comment
Please note, comments need to be approved before they are published.